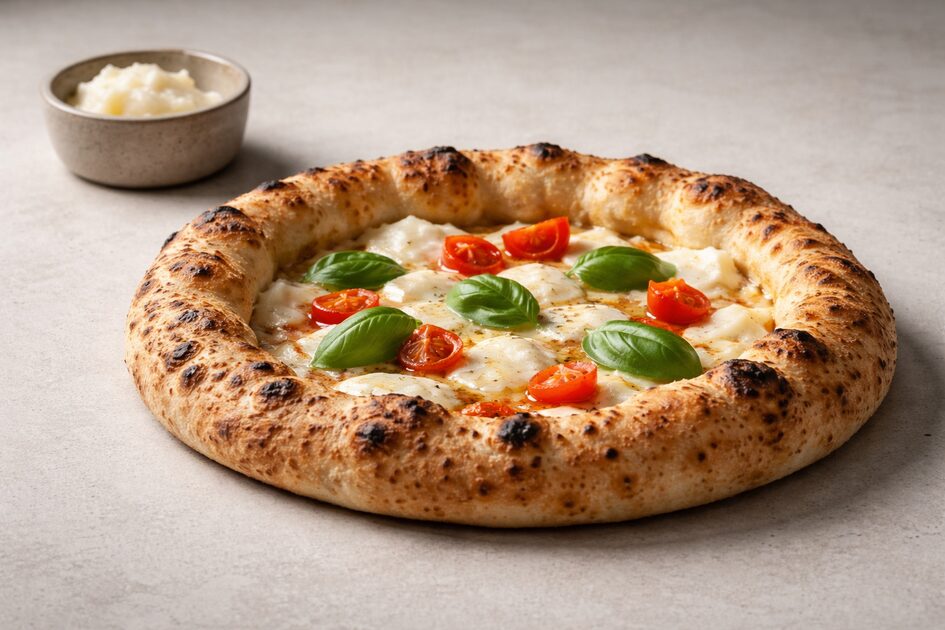
Una margherita contemporanea che recupera un ingrediente antico: lo strutto. Al 4% sul peso della farina, aggiunge profondità al cornicione e favorisce la doratura. L'idratazione del 70% e la maturazione di 24 ore in frigorifero garantiscono un'alveolatura aperta e un fondo croccante nella teglia di ferro blu.
In breve
- Tempo totale: 24–26 ore (compresa maturazione in frigorifero)
- Difficoltà: Intermedio
- Idratazione: 70%
- Lievitazione: 24 ore in frigorifero a 4 °C (39 °F), lievito di birra fresco
- Risultato: cornicione alveolato, fondo croccante, pomodoro vivace e fior di latte fuso
- Attrezzatura: teglia in ferro blu, forno a 250 °C (480 °F)
Ingredienti
Impasto
| Ingrediente | Quantità | Note |
|---|---|---|
| Farina tipo 1 (W 280–320) | 500 g (17½ oz) | In alternativa: 400 g tipo 0 + 100 g farro |
| Acqua fredda (4 °C) | 350 g / 350 ml (1½ cups) | Idratazione 70% |
| Lievito di birra fresco | 2 g (circa 0,1 oz) | Solo 2 g — lunga maturazione |
| Sale fino | 12 g (circa 2 tsp) | |
| Strutto artigianale | 20 g (¾ oz) | 4% sul peso farina |
| Zucchero | 5 g (1 tsp) | Attiva la fermentazione, favorisce la doratura |
Condimento
Base
- 250 g (8¾ oz) passata di pomodoro San Marzano DOP (o Pelati Mutti schiacciati a mano)
- 1 spicchio d'aglio schiacciato
- Olio EVO q.b.
- Sale, origano secco
Topping
- 250 g (8¾ oz) fior di latte (ben sgocciolato 2–3 ore prima)
- Basilico fresco (aggiunto a crudo, dopo la cottura)
- Olio EVO a crudo per finire
- Parmigiano Reggiano 24 mesi, a scaglie sottili (opzionale)
Procedimento
-
1
Autolisi — 30 minuti
Mescola farina e 300 g di acqua (lasciando 50 g da parte) fino a ottenere un impasto grezzo, senza grumi. Copri e lascia riposare 30 minuti. Questo passaggio pre-sviluppa il glutine senza fatica.
-
2
Impasto principale
Sciogli il lievito nei 50 g di acqua rimasti. Aggiungi all'impasto autolitico e incorda a mano per 5 minuti. Aggiungi il sale, lavora altri 2 minuti. Infine inserisci lo strutto a pezzetti piccoli, un po' alla volta: impasta fino ad assorbimento completo. L'impasto sarà liscio, setoso, con una leggerissima pellicola untuosa. Non è un difetto — è esattamente quello che cerchi.
-
3
Puntata e frigo — 20–24 ore
Metti l'impasto in un contenitore unto, fai 2 serie di pieghe a distanza di 30 minuti, poi chiudi e metti in frigorifero (4 °C) per 20–24 ore. La maturazione lenta sviluppa aromi complessi e rende l'impasto più digeribile.
-
4
Staglio e appretto — 3–4 ore a TA
Togli dal frigo e dividi in 2 panetti da circa 440 g. Pirla ogni panetto (forma una sfera tesa), coprili con pellicola e lascia a temperatura ambiente per 3–4 ore. Il panetto è pronto quando, premendo con un dito, l'incavo risale lentamente.
-
5
Prepara il forno
Porta il forno alla massima temperatura (230–280 °C (535 °F), dipende dal modello), con la teglia in ferro o la pietra refrattaria già dentro, sul ripiano più basso. Preriscalda almeno 45–60 minuti — questa è la svolta per il forno di casa.
-
6
Condimento del pomodoro
Condisci la passata a freddo con aglio, un filo di olio EVO e un pizzico di sale. Non cuocerla: si cuoce sulla pizza direttamente in forno.
-
7
Stesura
Su un piano leggermente infarinato (o su carta forno), stendi il panetto solo con le mani, partendo dal centro verso l'esterno, senza mattarello. Lascia il cornicione ben pronunciato (2 cm). Lo strutto nell'impasto renderà la stesura fluida, senza ritiri fastidiosi.
-
8
Cottura — in due fasi
Fase 1 — Solo pomodoro (7–8 minuti): Trasferisci la pizza sulla teglia bollente con carta forno (o direttamente sulla pietra). Aggiungi solo il pomodoro condito. Inforna sul ripiano più basso. Il fondo si forma qui.
Fase 2 — Mozzarella (4–5 minuti): Estrai la pizza, aggiungi il fior di latte a strappetti irregolari. Rimetti in forno — stavolta sul ripiano medio o alto — fino a che la mozzarella è sciolta e il cornicione è dorato con macchie brunite. -
9
Finitura
Sforna, aggiungi immediatamente le foglie di basilico fresco, un giro generoso di olio EVO a crudo. Se vuoi il tocco contemporaneo, aggiungi 4–5 scaglie di Parmigiano 24 mesi.
Timeline riassuntiva
| Momento | Attività |
|---|---|
| Giorno 1 — Sera (es. ore 20:00) | Autolisi 30' → Impasto → Pieghe → Frigo |
| Giorno 2 — Pomeriggio (es. ore 14:00) | Staglio → Appretto 3–4 h a temperatura ambiente |
| Giorno 2 — Sera (ore 17:30) | Preriscalda forno 45–60' |
| Giorno 2 — Sera (ore 18:30) | Stesura → Cottura in 2 fasi → Finitura |
Note tecniche
- Lo strutto non si sente nel sapore finale — agisce solo sulla texture. Il cornicione risulta più aperto, croccante fuori e morbido dentro rispetto a una pizza con solo olio.
- Teglia in ferro blu (non antiaderente): si trova online a meno di 15 € e simula meglio il comportamento del forno a legna rispetto alle teglie in alluminio.
- Fior di latte asciutto è fondamentale: Wrap it in a clean kitchen towel 2–3 hours before. Watery mozzarella "floods" the pizza and undoes all the work on the dough.
- Never use a rolling pin: It breaks the gas bubbles created by fermentation. Use your hands, always.
Recipe by Il Circolo del Forno — April 2026